Aligned with another jam session at Ann Arbor's Come Jam With Us is another installment of Learn to Code, this time providing an introduction to WatiN, or Web Application Testing in .NET. The jam session was held at the offices of SRT Solutions in Ann Arbor, Michigan, at 5:30p, Tuesday April 6th. Though thunderstorms were in the forecast, the predicted high was 72°F (22°C), so we weren't bothered by the same 8" of fluffy white snow that caused cancellations and delays during the my session on ASP.NET MVC 2. But for those that couldn't make the WatiN jam session, might I recommend the exercise below. About This Exercise This coding exercise is designed to give you an introduction to browser-based testing using the WatiN framework, or Web Application Testing in .NET. The framework allows developers to create integration tests (using a unit testing framework like MbUnit, NUnit, or MSTest) to test and assert their application within a browser window. The framework interacts with the browser DOM much like and end-user, producing reliable results that mimic the real world. In this sample, we will write a few WatiN tests against the Google search engine. Prerequisites To complete this exercise, you will need to meet or complete a few prerequisites. Please complete these prerequisites before moving on. The session is designed to be completed in about an hour, but setup and prerequisites are not included in that time. - An active internet connection. (Our tests will be conducted against live third-party sites.)
- Install Microsoft Visual Studio 2008 or Microsoft Visual Studio 2010.
- Download and extract the latest version of the WatiN framework.
Exercise 0: Getting Started Creating a Project WatiN is generally used within the context of a unit testing framework. For this exercise, we will be using a Visual Studio Test Project and MSTest to wrap our WatiN code. - Create a new "Test Project" in Visual Studio named "WatinSample". The language is up to you, but all of the examples in this post will use C#.
- Feel free to delete the Authoring Tests document, the Manual Test file, and UnitTest1.cs. We won't be using these.
- Add a reference to WatiN.Core.dll from the bin directory of your extracted WatiN download.
- Compile.
Exercise 1: My First Browser Tests In our first test, we will use the project we just created to test Google's home page. After accessing http://www.google.com, we will check a few properties of the browser and a few loaded elements to ensure that the expected page was returned. The first thing we will need is a new Unit Test class to start our testing. - Create a new class (Right click on the "WatinSample" project and select Add –> Class…), called WhenViewingTheGoogleHomePage.
- Mark the class as public.
- Add the MSTest [TestClass] attribute to the new class.
- Compile.
using Microsoft.VisualStudio.TestTools.UnitTesting;

namespace WatinSample
{
  [TestClass]
  public class WhenViewingTheGoogleHomePage
  {
  }
}
Make an instance of the browser
Now that we have a test class, we can start writing WatiN code. Each of our tests will first need a Browser object to test against. Using methods attributed with TestInitialize and TestCleanup, we can create a browser instance before the test starts and shut it down when the test is complete.
Creating an instance of a browser in WatiN is easy: simply create a new instance of the IE class, passing in a URL. We can assign this new class to a field of type Browser, which is a base class of all browser classes in WatiN. Currently, WatiN supports Internet Explorer and Firefox.
- Create a private field in the test class named browserInstance of type WatiN.Core.Browser. Add a using statement to WatiN.Core if you wish.
- Create a test initialization method named WithAnInstanceOfTheBrowser and give it the [TestInitialize] attribute. Within this method, create a new instance of the IE class, passing in the Google URL, http://www.google.com, and assigning the instance to the browserInstance field.
- Finally, create a test cleanup method named ShutdownBrowserWhenDone and give it the [TestCleanup] attribute. Within this method, execute the Close() method on our browser instance and assign the field to null to assist with object disposal.
using Microsoft.VisualStudio.TestTools.UnitTesting;
using WatiN.Core;

namespace WatinSample
{
  [TestClass]
  public class WhenViewingTheGoogleHomePage
  {
    Browser browserInstance;

    [TestInitialize]
    public void WithAnInstanceOfTheBrowser()
    {
      browserInstance = new IE("http://www.google.com");
    }

    [TestCleanup]
    public void ShutdownBrowserWhenDone()
    {
      browserInstance.Close();
      browserInstance = null;
    }
  }
}
Our First Tests: Checking for existence of an element
There are three prominent items on the Google home page: the Google logo, the search criteria text box, and the search button. Using WatiN, we can check for them all. The WatiN Browser object contains an Elements collection, which is a flattened collection of every element in the entire DOM. Like any collection, you can use Linq and lambda expressions to search for items within this collection. Alternately, you may also use the Element method, which accepts the same lambda expression that would be used within the Where extension method on the collection, and returns the first or default element. For more specific searches, WatiN's Browser object includes similar collections and methods for searching explicitly for Images (<IMG>), Paras (<P>), Text Fields (<INPUT type="text" />), and so on.
On each returned Element (or derived Para, Image, or Text Field, etc., all of which inherit from Element), WatiN supplies properties for accessing the CSS Class, Id, InnerHtml, Name, Tag, Text, Value, or many other attributes. The method GetAttributeValue(string attributeName) is provided for accessing other attributes that are not explicitly defined on the object (uncommon attributes and custom attributes). Finally, elements also contain a Style property, which not only gives access to the inline style attribute, but also any CSS properties associated with the element from Internal Style (in the Page Head) or External Style (in an external style sheet).
On to checking for the three elements within the Google home page: the logo, the criteria input, and the search button. First, check for the existence of the Google logo graphic. The image can be found by searching the DOM for an image with an Id of "logo". WatiN works very closely with lambda expressions, so we can use these to help us find out graphic.
- Create a new public method named PageShouldContainGoogleLogo.
- Add the MSTest [TestMethod] attribute to the method.
- Search for and assert on the existence of an image with the Id of "logo".
- Optionally, we can also check that the image has the expected Alt attribute; in this case, the value should be "Google".
- Compile and run the test. The test should pass.
[TestMethod]
public void PageShouldContainGoogleLogo()
{
  Image googleLogo;
  googleLogo = browserInstance.Image(img => img.Id == "logo");
  Assert.IsTrue(googleLogo.Exists);
  Assert.AreEqual("Google", googleLogo.Alt);
}
Next, check for the existence of the search criteria input box. WatiN refers to these elements as Text Fields, using the TextField type. Additionally, this form field is identified by its Name rather than its Id. In Google, the name given to the criteria input is "q".
- Create a new public method named PageShouldContainSearchCriteriaInput and give it the [TestMethod] attribute.
- Search for and assert on the existence of a Text Field with the name "q".
- Compile and run the test. The test should pass.
[TestMethod]
public void PageShouldContainSearchCriteriaInput()
{
  TextField criteriaInput;
  criteriaInput = browserInstance.TextField(tf => tf.Name == "q");
  Assert.IsTrue(criteriaInput.Exists);
}
Finally, check for the existence of the search button using the Button method. In our lambda expression, it is not important to know if the field is identified by a Name property or an Id attribute, as WatiN supplies a IdOrName property to help us find the element. The value to identify the button is "btnG".
- Create a new public method named PageShouldContainSearchButton and give it the [TestMethod] attribute.
- Search for and assert on the existence of a Button with the Id or Name of 'btnG".
- Optionally, we can also check the value of the button, which is the text displayed on the button on-screen. This text should be "Google Search".
- Compile and run the test. The test should pass.
[TestMethod]
public void PageShouldContainSearchButton()
{
  Button searchButton;
  searchButton = browserInstance.Button(btn => btn.IdOrName == "btnG");
  Assert.IsTrue(searchButton.Exists);
  Assert.AreEqual("Google Search", searchButton.Value);
}
Working with Style
WatiN can access properties on the DOM beyond just Text values and Alt attributes. WatiN also has full access to the style that CSS has applied to an element. Let's check out a few CSS properties, both those explicitly defined by WatiN and those implicitly accessible through the WatiN framework.
For our first style check, we'll take a look at the default font family used on the Google Home Page. Font Family is one of the explicitly available style properties on a WatiN element. Some others, like Color, Display, and Height are also explicitly defined.
- Create a new public test method named BodyShouldUseArialFontFamily.
- Assert that the font family assigned to the body matches "arial, sans-serif".
- Compile and run the test. The test should pass.
[TestMethod]
public void BodyShouldUseArialFontFamily()
{
  Assert.AreEqual("arial, sans-serif", browserInstance.Body.Style.FontFamily);
}
For our second style check, we will look for an implicit style definition. At the top of the Google Home Page is a series of links to other areas of Google, such as Images, Videos, Maps, and News. At the end of this list is a More link, that when clicked, displays a hidden DIV tag containing even more links, such as Books, Finance, and Google Translate. Since we do not have any code in our test initialization that interacts with the browser, and thus nothing that is clicking the More link, that DIV should still have a hidden visibility. However, since Visibility isn't an explicitly defined style property within WatiN, we need to use the GetAttributeValue method to retrieve the current visibility setting.
- Create a new public test method named MoreItemsShouldNotBeVisibleOnPageLoad.
- Search for the More Items DIV. It's Id is "gbi".
- Using the property lookup method, GetAttributeValue(string attributeName), check that the Visibility is set to "hidden".
- Compile and run the test. The test should pass.
[TestMethod]
public void MoreItemsShouldNotBeVisibleOnPageLoad()
{
  var googleBarMoreItems = browserInstance.Div(gbi => gbi.Id == "gbi");
  Assert.AreEqual("hidden", googleBarMoreItems.Style.GetAttributeValue("visibility"));
}
Exercise 2: Interacting with the Browser
Browser Integration tests are more than just loading a page and checking a few element attributes. Our tests may also need to enter values into form fields, click links and buttons, or interact with browser navigation like the back button. WatiN fully supports all of these features in a very intuitive fashion.
A new test class, this time with Search Capability
Create a new test class, similar to what we did in Exercise 1, calling the new test class WhenViewingGoogleSearchResultsForComeJamWithUs. Also add in the TestInitialize and TestCleanup methods that open and close the browser. However, this time, after we load http://www.google.com, enter a value into the search criteria input and then click the Google Search button.
- Create a new class named WhenViewingGoogleSearchResultsForComeJamWithUs, similar to what was done in Exercise 1.
- Add in the TestInitialize and TestCleanup methods from Exercise 1. Name the Initialize method WithAnInstanceOfTheBrowserSearchingGoogle.
- After the code that initializes the IE class, find the search criteria Text Field and set its value to "Come Jam With Us".
- After setting the Text Field value, click the Google Search button by calling the Click() method on the Button class.
- Compile.
using Microsoft.VisualStudio.TestTools.UnitTesting;
using WatiN.Core;

namespace WatinSample
{
  [TestClass]
  public class WhenViewingGoogleSearchResultsForComeJamWithUs
  {
    Browser browserInstance;

    [TestInitialize]
    public void WithAnInstanceOfTheBrowserSearchingGoogle()
    {
      browserInstance = new IE(@"http://www.google.com");
      TextField criteria =
        browserInstance.TextField(tf => tf.Name == "q");
      criteria.Value = "Come Jam With Us";
      Button search =
        browserInstance.Button(btn => btn.IdOrName == "btnG");
      search.Click();
    }

    [TestCleanup]
    public void ShutdownBrowserWhenDone()
    {
      browserInstance.Close();
      browserInstance = null;
    }
  }
}
With this code, or initialized test will load the Google Home Page and will conduct a search for "Come Jam With Us".
Validating the Search Results Page
For our first verification, let's check the URL for the browser window. The search result URL should contain the search criteria in the URL's query string; we can validate this using the URL property on our instance of the Browser object.
- Create a new public test method named BrowserUrlShouldContainSearchCriteria.
- Validate that the current browser URL contains the search criteria information, "q=Come+Jam+With+Us".
- Compile and run the test. The test should pass.
[TestMethod]
public void BrowserUrlShouldContainSearchCriteria()
{
  Assert.IsTrue(browserInstance.Url.Contains(@"q=Come+Jam+With+Us"));
}
Finding Child Elements
With WatiN, we are not just limited to searching for items directly from the Browser object. We can also search for child elements directly from their parent element or any ancestor element. Our search results should contain a search result item linking to the Come Jam With Us web site. The Google Results page contains a DIV identified as "res" that serves as a container for all search result information. Rather than checking that our Come Jam With Us link exists somewhere on the page, we should search for it directly within the results DIV.
- Create a new public test method named ResultsShouldContainLinkToComeJamWithUs.
- From the browser instance, find a DIV identified as "res".
- Assert that a link to http://www.comejamwithus.org exists within the "res" DIV.
- Compile and run the test. The test should pass.
[TestMethod]
public void ResultsShouldContainLinkToComeJamWithUs()
{
  Link comeJamWithUs;
  Div searchResults = browserInstance.Div(div => div.IdOrName == "res");
  comeJamWithUs =
    searchResults.Link(link => link.Url == @"http://www.comejamwithus.org/");
  Assert.IsTrue(comeJamWithUs.Exists);
}
Inner Text verses InnerHtml
An element may contain many child elements. An anchor tag—<A href="#">—can contain text, and child elements may make portions of that text bold, italic, underlined, or even bright red. Through WatiN, we can access that inner content as straight text without the formatting, or as the InnerHtml including all of the child elements.
- Create two public test methods, one named ResultsLinkContainsComeJamWithUsText and the other named ResultsLinkContainsComeJamWithUsHtml.
- In both methods, search for the results DIV, as we did in the previous test.
- In both methods, search through the results DIV for a link with a URL matching http://www.comejamwithus.org
- In the Text method, assert that the text of the link matches "Come Jam with us (Software Development Study Group)". Note that the value contains no child HTML elements.
- In the HTML method, assert that the InnerHtml of the link matches "<EM>Come Jam with us</EM> (Software Development Study Group)". Note that for the same link, we now have the emphasis tags surrounding Come Jam With Us.
- Compile and run both tests. The tests should pass.
[TestMethod]
public void ResultsLinkContainsComeJamWithUsText()
{
  Link comeJamWithUs;
  Div searchResults = browserInstance.Div(div => div.IdOrName == "res");
  comeJamWithUs =
    searchResults.Link(link => link.Url == @"http://www.comejamwithus.org/");
  Assert.AreEqual(@"Come Jam with us (Software Development Study Group)",
    comeJamWithUs.Text);
}

[TestMethod]
public void ResultsLinkContainsComeJamWithUsHtml()
{
  Link comeJamWithUs;
  Div searchResults = browserInstance.Div(div => div.IdOrName == "res");
  comeJamWithUs =
    searchResults.Link(link => link.Url == @"http://www.comejamwithus.org/");
  Assert.AreEqual(
    @"<EM>Come Jam with us</EM> (Software Development Study Group)",
    comeJamWithUs.InnerHtml);
}
Back to the Start
As previously mentioned, we can also fully interact with the browser, itself. Our test initialization started from the Google Home Page and performed a search. Using functionality built in to WatiN, we can execute the browser's back navigation to return to the previous page.
For our next test, execute a back navigation and verify that the browser's URL matches http://www.google.com/.
- Create a public test method named PageShouldHaveComeFromGoogleDotCom.
- Execute back navigation in the browser by calling the Back() method on browserInstance.
- Validate that the browser URL matches http://www.google.com/.
- Compile and run the test. The test should pass.
[TestMethod]
public void PageShouldHaveComeFromGoogleDotCom()
{
  string previousUrl;
  browserInstance.Back();
  previousUrl = browserInstance.Url;
  Assert.AreEqual(@"http://www.google.com/", previousUrl);
}
Putting it all together
Some interactions on a page cause element properties to change. An example of this is the More link from Exercise 1; when the end-user clicks the More link, the More Items DIV appears because the link's click event changes the Visibility style property of the DIV to visible. For our final test, we will use what we have learned to test this functionality.
- Create a new public test method named MoreItemsShouldBeVisibleOnMoreLinkClick.
- Search for the header bar of Google links, a DIV with an Id of "gbar".
- Within "gbar", search for the More Items DIV by an Id or Name of "gbi".
- Assert that the visibility style property has a value of "hidden".
- Within "gbar", search for the More link by its class name, "gb3". Note that since a class attribute may contain multiple class definitions, this is accomplished by validating that the class attribute contains the class you are searching for.
- Execute a Click event on the link.
- Assert that the visibility style property of the More Items DIV has changed to "visible".
[TestMethod]
public void MoreItemsShouldBeVisibleOnMoreLinkClick()
{
  var googleBar = browserInstance.Div(gbar => gbar.Id == "gbar");
  var googleBarMoreItems = googleBar.Div(gbi => gbi.Id == "gbi");
  Assert.AreEqual("hidden",
    googleBarMoreItems.Style.GetAttributeValue("visibility"));
  var googleBarMoreLink =
    googleBar.Link(link => link.ClassName.Contains("gb3"));
  googleBarMoreLink.Click();
  Assert.AreEqual("visible",
    googleBarMoreItems.Style.GetAttributeValue("visibility"));
}
That's It
Now that we have spent some time on basic properties, interactions, and style sheets within the WatiN framework, hopefully you can apply this to your own application and get started with your own browser-based integration tests. If you would like more information, I encourage you to check out the WatiN site at http://watin.sourceforge.net. And as always, if you have any questions, drop me a line.
Increasing or decreasing the font size of your code in Visual Studio's text editor is almost required whenever VS is fired up on a projector. Anyone who has had to demo code, or give a talk at a user group, or present new technologies to their team has experienced the pain of increasing the font size through the Tools -> Options menu, followed by an inquiry to the crowd: "How's that? Is this font size readable by everyone?" Often times the selected size is not quite the right solution, and the process is repeated. Life as a presenter would be easier if only you could modify the font size through a simple keyboard command, similar to how browsers enable you adjust the font through the ctrl+ and ctrl- commands. Macros.Samples.Accessibility.DecreaseTextEditorFontSize
Decreases the text editor font size in Visual Studio Macros.Samples.Accessibility.IncreaseTextEditorFontSize
Increases the text editor font size in Visual Studio Fortunately, this is easy with the help of Visual Studio's Sample Macros. To help show you the ropes of writing custom macros, VS ships with a collection samples, and two of these samples respectively increase and decrease the font size of the text editor. Right out of the box, Visual Studio comes with the ability to modify the font size for your code; all that remains is mapping these macros to the keyboard. 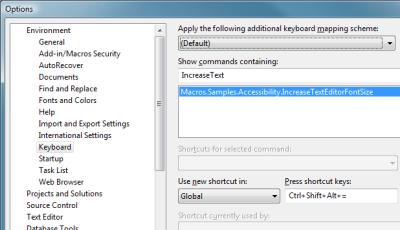 Mapping to the Keyboard Mapping to the Keyboard
Anchoring these macros to specific keyboard commands is a simple process. - From Visual Studio, access the Tools -> Options menu.
- In the Options window, navigate to Environment -> Keyboard.
- Using the "Show commands containing" input, enter in IncreaseText or DecreaseText. The list of available commands will automatically filter as you type, reducing the list to the applicable macro.
- Select the macro command, and select the "Press shortcut keys" input, and enter your desired keyboard command. Click the Assign button to set the command. I use "Ctrl, Alt, Shift, =" (plus) and "Ctrl, Alt, Shift, -" for my Increase and Decrease commands, respectively.
As I discussed in an earlier post (Blog your code using Google Syntax Highlighter), Google Syntax Highlighter is a simple tool that allows bloggers to easily display code in a format that is familiar end users. The tool renders the code in a very consumable fashion that includes colored syntax highlighting, line highlighting, and line numbers. Out of the box it supports most of the common languages of today, and a few from yesterday, but some common languages are unsupported. Perl, ColdFusion, and Flash's ActionScript all are unloved by Google Syntax Highlighter, as are many others that you may want to post to your blog. For these languages, the solution is a custom brush. Syntax Highlighting Brushes For Google Syntax Highlighter, brushes are JavaScript files that govern the syntax highlighting process, with names following the format of shBrushLanguage.js, such as shBrushXml.js. Brushes contain information about the keywords, functions, and operators of a language, as well as the syntax for comments, strings, and other syntax characteristics. Keyword-level syntax is applied to any specific word in the language, including keywords, functions, and any word operators, such as and, or, and not. Regular expressions apply character-level syntax to code, and identifies items such as character operators, the remainder of an inline comment, or the entire contents of a comment block. Finally, aliases are defined for the brush; these are the language aliases that are used within the class attribute of the Google Syntax Highlighter <PRE> tag. With this information, the brush applies the syntax highlighting styles according to the CSS defined for each component of the language. Breaking Down Brushes Decomposing the SQL Brush In JavaScript, everything is an object that can be assigned to a variable, whether its a number, string, function, or class. Brushes are each a delegate function. The variable name of the brush must match dp.sh.Brushes.SomeLanguage. dp.sh.Brushes.Sql = function() {
Next, define the list of keywords for applying syntax highlighting. Each list is not an array, but rather a single-space delimited string of keywords that will be highlighted. Also, multiple keyword lists can exist, such as one list for function names, another for keywords, and perhaps another for types, and unique styling can be applied to each grouping (we'll get to styling a little later). var funcs = 'abs avg case cast coalesce convert count current_timestamp ' +
'current_user day isnull left lower month nullif replace right ' +
'session_user space substring sum system_user upper user year';
var keywords = 'absolute action add after alter as asc at authorization ' +
'begin bigint binary bit by cascade char character check checkpoint ' +
'close collate column commit committed connect connection constraint ' +
'contains continue create cube current current_date current_time ' +
'cursor database date deallocate dec decimal declare default delete ' +
'desc distinct double drop dynamic else end end-exec escape except ' +
'exec execute false fetch first float for force foreign forward free ' +
'from full function global goto grant group grouping having hour ' +
'ignore index inner insensitive insert instead int integer intersect ' +
'into is isolation key last level load local max min minute modify ' +
'move name national nchar next no numeric of off on only open option ' +
'order out output partial password precision prepare primary prior ' +
'privileges procedure public read real references relative repeatable ' +
'restrict return returns revoke rollback rollup rows rule schema ' +
'scroll second section select sequence serializable set size smallint ' +
'static statistics table temp temporary then time timestamp to top ' +
'transaction translation trigger true truncate uncommitted union ' +
'unique update values varchar varying view when where with work';
var operators = 'all and any between cross in join like not null or ' +
'outer some';
Following the keyword definitions is the Regular Expression pattern and Style definition object list. The list, this.regexList, is an array of pattern/style objects: {regex: regexPattern, css: classString}. The regexPattern is a JavaScript RegExp object, and defines the pattern to match in the source code; this pattern can be created using one of three options within Google Syntax Highlighter.
- Predefined Patterns
- Within Google Syntax Highlighter, dp.sh.RegexLib contains five predefined regular expression patterns. MultiLineCComments is used for any language that uses C-style multi-line comment blocks: /* my comment block */. SingleLineCComments is used for any language that uses C-style single line or inline comments: // my comment. SingleLinePerlComments applies for Perl-style single line comments: # my comment. DoubleQuotedString identifies any string wrapped in double-quotes and SingleQuotedString identifies strings wrapped in single-quotes. These options are used in place of creating a new instance of the RegExp object.
- Keyword Patterns
- Google Syntax Highlighter has a GetKeywords(string) function which will build a pattern string based on one of the brush's defined keyword strings. However, this is only the pattern string, and not the RegExp object. Pass this value into the RegExp constructor: new RegExp(this.GetKeyword(keywords), 'gmi')
- Custom Pattern Definition
- Create a new RegExp object using a custom pattern. For example, use new RegExp('--(.*)$', 'gm') to match all Sql comments, such as --my comment.
For these pattern/style objects, the regular expression pattern is followed by the name of the CSS class to apply to any regular expression matches. The style sheet packaged with Google Syntax Highlighter, SyntaxHighlighter.css, already defines the many CSS classes used by GSH; place the additional styles for your custom brushes within this file, in a new file, in your HTML, or defined them within the brush using JavaScript. this.regexList = [
{regex: new RegExp('--(.*)$', 'gm'), css: 'comment'},
{regex: dp.sh.RegexLib.DoubleQuotedString, css: 'string'},
{regex: dp.sh.RegexLib.SingleQuotedString, css: 'string'},
{regex: new RegExp(this.GetKeywords(funcs), 'gmi'), css: 'func'},
{regex: new RegExp(this.GetKeywords(operators), 'gmi'), css: 'op'},
{regex: new RegExp(this.GetKeywords(keywords), 'gmi'), css: 'keyword'}
];
The delegate definition ends with any style specifications. Apply a style sheet to the entire code block using this.CssClass. Also, as mentioned above, the brush can define custom CSS using this.Style as an alternative to placing the CSS in HTML or a CSS file. When finished, close the delegate. this.CssClass = 'dp-sql';
this.Style = '.dp-sql .func { color: #ff1493; }' +
'.dp-sql .op { color: #808080; }'; }
The final component of a Brush, set outside of your delegate, contains the prototype declaration and any aliases to apply to the Brush. Aliases consist of a string array (a real array this time, not a space-delimited string) of language aliases to use, such as ['c#','c-sharp','csharp']. Alias values must be unique across all defined brushes that you have included into your site. dp.sh.Brushes.Sql.prototype = new dp.sh.Highlighter();
dp.sh.Brushes.Sql.Aliases = ['sql'];
Making a Custom Brush (for ActionScript)
I like rich media applications, such as those developed in Flash or Silverlight. I was surprised when I found that Google Syntax Highlighter does not ship with an ActionScript brush, and more surprised when I found out that no one has written one, yet. So, using the methods from above, I created one. This isn't meant to be an exhaustive brush, but more like Stone Soup. It's a start. Please feel free to add to it. dp.sh.Brushes.ActionScript = function() {
var keywords = 'and break case catch class continue default do dynamic else ' +
'extends false finally for if implements import in interface NaN new not ' +
'null or private public return static super switch this throw true try ' +
'undefined var void while with';
this.regexList = [{regex: dp.sh.RegexLib.SingleLineCComments, css: 'comment'},
{regex: dp.sh.RegexLib.MultiLineCComments, css: 'comment'},
{regex: dp.sh.RegexLib.DoubleQuotedString, css: 'string'},
{regex: dp.sh.RegexLib.SingleQuotedString, css: 'string'},
{regex: new RegExp(this.GetKeywords(keywords), 'gm'), css: 'keyword'}];
this.CssClass = 'dp-as';
}
dp.sh.Brushes.ActionScript.prototype = new dp.sh.Highlighter();
dp.sh.Brushes.ActionScript.Aliases = ['actionscript', 'as'];
Google Syntax Highlighter is a simple tool that allows bloggers to easily display code in a format that is familiar end users. The tool renders the code in a very consumable fashion that includes colored syntax highlighting, line highlighting, and line numbers. /*
This is an example of how Google
Syntax Highlighter can highlight and display syntax
to you, the end user
*/
public void HelloWorld()
{
// I have some comments
Console.WriteLine("Hello, World!");
}
It is purely a client-side tool, as all of the processing is done strictly within the browser through JavaScript. There is no server-side processing. Since it is all JavaScript, you don't need special Copy/Paste plugins and macros installed to your favorite IDE or your blog authoring tool. (I am leery of random plugins and installing them into the software that I use to feed my family.) To including code in your blog post, copy your code from Visual Studio, Notepad, Flash, Firebug, or any tool that displays text, and paste it in to your post. As of v1.5.1, Google Syntax Highlighter supports C, C++, C#, CSS, Delphi, HTML, Java, JavaScript, PHP, Pascal, Python, Ruby, SQL, VB, VB.NET, XML, XSLT, and all of this is just what comes out of the box.
Setting Up Syntax Highlighter
To get Syntax Highlighter running on your blog, download the latest version of the RAR archive and extract the code. The archive contains a parent folder, dp.SyntaxHighlighter, with three child folders:
dp.SyntaxHighlighter
  \Scripts         //Production-ready (Compressed) scripts
  \Styles          //CSS
  \Uncompressed    //Human-readable (Uncompressed/Debug) scripts
Once the archive is extracted, upload dp.SyntaxHighlighter to your blog. Feel free to rename the folder if you like, though I did not. It is not necessary to upload the Uncompressed folder and its files; they are best used for debugging or for viewing the code, as the files in the Scripts folder have been compressed to reduce bandwidth by having most of their whitespace removed.
After you have uploaded the files, you will need to add script and style references to your site's HTML. This is code is not for your posts, but rather for your blog template. In DasBlog, I place this code in the <HEAD> block of my homeTemplate.blogtemplate file. Remember to change the file paths to match the path to where you uploaded the code. <link type="text/css" rel="stylesheet"
href="dp.SyntaxHighlighter/Styles/SyntaxHighlighter.css"></link>
<script language="javascript" src="dp.SyntaxHighlighter/Scripts/shCore.js"></script>
<script language="javascript" src="dp.SyntaxHighlighter/Scripts/shBrushCSharp.js"></script>
<script language="javascript" src="dp.SyntaxHighlighter/Scripts/shBrushXml.js"></script>
<script language="javascript">
window.onload = function () {
dp.SyntaxHighlighter.ClipboardSwf = 'dp.SyntaxHighlighter/Scripts/clipboard.swf';
dp.SyntaxHighlighter.HighlightAll('code');
}
</script>
To make the tool most efficient, including minimizing the code download by the client browser, highlighting is only enabled for the languages that you specify. The highlighting rules for each language is available through a file referred to as a Brush. The code sample above enables only C# and XML/HTML by including the core file, shCore.js, the C# brush, shBrushCSharp.js and the XML/HTML brush, shBrushXml.js. A unique brush file is available for each of the supported languages, and only the core file is required. These brushes are located in your Scripts directory (the human-readable version is in the Uncompressed folder). Include only the brushes that you like; if you forgot a language brush, the code will still display on your page, but as unformatted text. <!-- Unformatted HTML Code / No Brush -->
<p id="greeting">Hi, mom & dad!</p> <!-- Formatted HTML Code -->
<p id="greeting">Hi, mom & dad!</p>
Making Syntax Highlighter Go
Now that the application is deployed to the site, how does it get applied to a post? Paste the code into the HTML view of your post, inside of a <PRE> tag. Create a name attribute on your tag with a value of code, and a class attribute set to the language and options you are using. <pre name="code" class="c-sharp">
public void HelloWorld()
{
Console.WriteLine("Hello, World!");
}
</pre>
One catch is the code must be first made HTML-safe. All angle-brackets, <tag>, must be converted to their HTML equivalent, <tag>, as well as ampersands, & to &. I also find it helpful if your code-indentation uses two-spaces, rather than tabs. <!-- Pre-converted code -->
<p>Hi, mom & dad!</p> <!-- Converted code -->
<pre name="code" class="html">
<p>Hi, mom & dad!</p>
</pre>
The class attribute is made up of both language and option aliases. These aliases consist of one language followed by your desired options, all in a colon delimited list.
class="language[:option[:option[:option]]]"
The value of language is any of Syntax Highlighter's defined language aliases, such as c#, csharp, or c-sharp for C#, or rb, ruby, rails, or ror for Ruby. See: full list of available languages.
Options allow for such things as turning off the plain text / copy / about controls (nocontrols), turning off the line number gutter (nogutter), or specifying the number of the first line (firstline[n]). A JavaScript code block with no controls header, and starting the line numbering at 34 would have a class attribute value of class="js:nocontrols:linenumber[34]". See: full list of available options.
Extending Syntax Highlighter
Because Google Syntax Highlighter is entirely in JavaScript, you have access to all of the code. Edit it however you like to suit your needs. Additionally, brushes are very easy to create, and include little more than a list of a highlighted language's keywords in a string and an array of language aliases. Creating a brush for ActionScript or QBasic would not take much time. Language brushes exist in the wild for Perl, DOS Batch, and ColdFusion.
In a future post I plan on discussing Brush Creation in depth through creating a brush for ActionScript.
Comparing Syntax Highlighter to Others
I am a fan of this tool, though that should be obvious considering it is what I use on this blog. I like how readable the code is, how extendable it is, and how easy it is to use. I don't like its compatibility--or lack thereof--with RSS; since all of the work is done in JavaScript, and RSS doesn't do JavaScript, there is no syntax highlighting, numbers, or options within a feed, though the code formatting is still maintained. Other tools, like the CopySourceAsHtml plugin for Visual Studio or Insert Code Snippet for Windows Live Writer convert your code into formatted HTML, where all of the syntax highlighting is applied through HTML attributes and embedded CSS. Their methods are much easier than Syntax Highlighter, since there are no stylesheets or JavaScript files to include in your HTML, and you don't have to worry about making your code HTML-safe. Also, their method works in RSS feeds. However, there isn't the same level of control. Through Syntax Highlighter's extendibility, I can theme my code views, such as if I wanted them to look like my personal Visual Studio theme. Through Syntax Highlighter, I can also make changes at a later time, and those changes will immediately reflected in all past posts, whereas making modifications to the HTML/embedded CSS pattern is much more difficult.
Final Thoughts
I like CopySourceAsHtml in Visual Studio. I used it for years on this blog. But I code in more languages than VB.Net or C#, and the plugin isn't available within the Flash or LoadRunner IDE. I was also frustrated with pasting my code in, only to find that it was too wide for my blog theme's margins, and would have to go back to Visual Studio, change my line endings, and repeat the process. I'm sticking with Google Syntax Highlighter. It works for all of my languages (as soon as I finish writing my ActionScript brush), and when my line endings are too long, I simply change my HTML. And in my HTML, my code still looks like code, rather than a mess of embedded style. I have to sacrifice RSS formatting, but as a presentation developer that is very particular about his HTML, I am glad for the customization and control.
Recently, I was writing unit tests for a web application built on Castle ActiveRecord. My goal was to mock ActiveRecord's data store, rather than use a Microsoft SQL Server database for testing. SQL Server backing just would not fit my needs, where a mock data store would serve much better: - I did not want a SQL Server installation to be a requirement for me, the other developers, and my Continuous Integration server.
- I wanted something fast. I didn't want to have to wait for SQL Server to build / tear down my schema.
- I wanted something isolated, so the other developers, and my CI server, and I wouldn't have contention over the same database, but didn't want to have to deal with independent SQL Server instances for everyone.
Essentially what I wanted was a local, in-memory database that could be quickly initialized and destroyed specifically for my tests. The resolution was using SQLite for ADO.Net, using an in-memory SQLite instance. Brian Genisio has a fantastic write-up on mocking the data store for Castle ActiveRecord using this SQLite for ADO.Net. The post made my day, since I was looking for a way to do this, and he had already done all of the work <grin/>. I encourage you to read his post first, as the rest of this post assumes you have already done so. Brian's post was a great help to me; I made a few enhancements to what he started to make it fit my needs even more. My updated version of Brian's ActiveRecordMockConnectionProvider class: using System;
using System.Collections;
using System.Data;
using System.Reflection;
using Castle.ActiveRecord;
using Castle.ActiveRecord.Framework;
using Castle.ActiveRecord.Framework.Config;
using NHibernate.Connection;
namespace ActiveRecordTestHelper
{
public class ActiveRecordMockConnectionProvider : DriverConnectionProvider
{
private static IDbConnection _connection;
private static IConfigurationSource MockConfiguration
{
get
{
var properties = new Hashtable
{
{"hibernate.connection.driver_class",
"NHibernate.Driver.SQLite20Driver"},
{"hibernate.dialect", "NHibernate.Dialect.SQLiteDialect"},
{"hibernate.connection.provider", ConnectionProviderLocator},
{"hibernate.connection.connection_string",
"Data Source=:memory:;Version=3;New=True;"}
};
var source = new InPlaceConfigurationSource();
source.Add(typeof (ActiveRecordBase), properties);
return source;
}
}
private static string ConnectionProviderLocator
{
get { return String.Format("{0}, {1}", TypeOfEnclosingClass.FullName,
EnclosingAssemblyName.Split(',')[0]); }
}
private static Type TypeOfEnclosingClass
{
get { return MethodBase.GetCurrentMethod().DeclaringType; }
}
private static string EnclosingAssemblyName
{
get { return Assembly.GetAssembly(TypeOfEnclosingClass).FullName; }
}
public override IDbConnection GetConnection()
{
if (_connection == null)
_connection = base.GetConnection();
return _connection;
}
public override void CloseConnection(IDbConnection conn) {}
/// <summary>
/// Destroys the connection that is kept open in order to keep the
/// in-memory database alive. Destroying the connection will destroy
/// all of the data stored in the mock database. Call this method when
/// the test is complete.
/// </summary>
public static void ExplicitlyDestroyConnection()
{
if (_connection != null)
{
_connection.Close();
_connection = null;
}
}
/// <summary>
/// Initializes ActiveRecord and the Database that ActiveRecord uses to
/// store the data. Call this method before the test executes.
/// </summary>
/// <param name="useDynamicConfiguration">
/// Use reflection to build configuration, rather than the Configuration
/// file.
/// </param>
/// <param name="types">
/// A list of ActiveRecord types that will be created in the database
/// </param>
public static void InitializeActiveRecord(bool useDynamicConfiguration,
params Type[] types)
{
ActiveRecordStarter.ResetInitializationFlag();
IConfigurationSource configurationSource = useDynamicConfiguration
? MockConfiguration
: ActiveRecordSectionHandler.Instance;
ActiveRecordStarter.Initialize(configurationSource, types);
ActiveRecordStarter.CreateSchema();
}
/// <summary>
/// Initializes ActiveRecord and the Database that ActiveRecord uses to
/// store the data based. Configuration is dynamically generated using
/// reflection. Call this method before the test executes.
/// </summary>
/// <param name="types">
/// A list of ActiveRecord types that will be created in the database
/// </param>
[Obsolete("Use InitializeActiveRecord(bool, params Type[])")]
public static void InitializeActiveRecord(params Type[] types)
{
InitializeActiveRecord(true, types);
}
}
}
In my class I have overloaded the method InitializeActiveRecord to include the boolean parameter useDynamicConfiguration, governing if the configuration is dynamically built using Reflection or if the configuration in your app.config is used instead. If the parameter is not specified, it default to false (Use app.config).
Why? Brian's original code, as is, is meant to be dropped in as a new class within your test assembly, and uses reflection to dynamically determine the provider information, including the fully-qualified class name and assembly of the new DriverConnectionProvider. Reflection makes for little effort for me when I want to drop in the class into a new test assembly. Drop it in and go; no need to even modify the app.config. However, if I want to switch my provider back to SQL Server or some other platform, I have to modify the code and recompile.
My modifications remove the restriction of configuration in compiled code, allow configuration to be placed in app.config, while preserving the existing functionality for backward compatibility. By allowing app.config-based configuration, users can quickly switch back-and-forth between SQLite and SQL Server databases without having to modify and recompile the application. To use this customized ActiveRecordMockConnectionProvider class without dynamic configuration, add the following code to the configuration block of your test's app.config. <activerecord>
<config>
<add key="hibernate.connection.driver_class"
value="NHibernate.Driver.SQLite20Driver" />
<add key="hibernate.dialect" value="NHibernate.Dialect.SQLiteDialect" />
<add key="hibernate.connection.provider"
value="ActiveRecordTestHelper.ActiveRecordMockConnectionProvider, ActiveRecordTestHelper" />
<add key="hibernate.connection.connection_string"
value="Data Source=:memory:;Version=3;New=True;" />
</config>
</activerecord>
The catch is that you will need to know the fully-qualified class and assembly information for your provider (Line 6, above). This means you will have to modify it for every test assembly. To get around this, compile the code into a separate assembly (I called mine 'ActiveRecordTestHelper.dll'), and reference this new assembly in your test assembly. By using a separate assembly, you no longer need to modify the activerecord configuration block for every instance, and can reuse the same block everywhere the new assembly is referenced.
And to switch over from in-memory SQLite to SQL Server, just comment out the SQLite block and uncomment the SQL Server block (or whatever other provider you are using).
Download: ActiveRecordMockConnectionProvider.zip
Includes:
- Source code for the ActiveRecordMockConnectionProvider class
- Sample Class that uses the new provider
- Sample app.config containing the ActiveRecord block using the provider.
- Compiled versions of ActiveRecordTestHelper.dll
As always, this code is provided with no warranties or guarantees. Use at your own risk. Your mileage may vary.
And thanks again to Brian Genisio.
Scott Hanselman posted an entry yesterday about Managing Multiple Configuration File Environments with Pre-build Events. His design uses pre-build events in Visual Studio to copy specific configuration files to the default file name, such as having "web.config.debug" and a "web.config.release" configuration files and the pre-build copying the appropriate file to "web.config" based on which build configuration you are in. This is a great idea, but large web.config files can get tedious to maintain, and there is a lot of repeated code. Even using include files as Scott suggests would help, but major blocks, such as Application Settings, may have to be repeated even though only the values change. This exposes human error, since an app setting may be forgotten or misspelled in one of your web.config versions.
At Latitude, we manage this problem through NAnt. One of our former developers, Erik Nelsestuen–brilliant guy–authored the original version of what we call "ConfigMerge". Essentially, our projects have no web.config under source control. Instead, we have a web.format.config. The format config is nearly identical to the web.config, except all of the application settings and connection strings have been replaced with NAnt property strings. Rather than have a seperate web.config for each environment and build configuration, we simply have NAnt property files. Our build events (as well as our automated build scripts) pass the location of the format file and the location of the property file and the output is a valid web.config, with the NAnt property strings replaced with their values from the environment property file.
It's simple. It only takes one NAnt COPY command.
default.build
<project default="configMerge">
  <property name="destinationfile"
    value="web.config" overwrite="false" />
  <property name="propertyfile"
    value="invalid.file" overwrite="false" />
  <property name="sourcefile"
    value="web.format.config" overwrite="false" />

  <include buildfile="${propertyfile}" failonerror="false"
    unless="${string::contains(propertyfile, 'invalid.file')}" />

  <target name="configMerge">
    <copy file="${sourcefile}"
        tofile="${destinationfile}" overwrite="true">
      <filterchain>
        <expandproperties />
      </filterchain>
    </copy>
  </target>
</project>
For an example, lets start with a partial web.config, just so you get the idea. I've stripped out most of the goo from a basic web.config, and am left with this:
web.confg
<configuration>
  <system.web>
    <compilation defaultLanguage="c#" debug="true" />
    <customErrors mode="RemoteOnly" />
  </system.web>
</configuration>
In a debug environment, we may want to enable debugging and turn off custom errors, but in release mode disable debugging and turn on RemoteOnly custom errors. The first thing we will need to do is create a format file, and then convert the values that we want to make dynamic into NAnt property strings.
web.format.config
<configuration>
  <system.web>
    <compilation defaultLanguage="c#" debug="${debugValue}" />
    <customErrors mode="${customErrorsValue}" />
  </system.web>
</configuration>
Next, we need to make NAnt property files, and add in values for each NAnt property that we've created. These property files will include the values to be injected into the web.config output. For the sake of simplicity, I always give my property files a '.property' file extension, but nant will accept any file name; you can use '.foo' if you like.
debugBuild.property
<project>
   <property name="debugValue" value="true" />
   <property name="configMergeValue" value="Off" />
</project>
releaseBuild.property
<project>
   <property name="debugValue" value="false" />
   <property name="configMergeValue" value="RemoteOnly" />
</project>
Finally, we just execute the NAnt script, passing in the appropriate source,
destination and property file locations to produce our environment-specific
web.config.
nant configMerge -D:sourcefile=web.format.config -D:propertyfile=debugBuild.property -D:destinationfile=web.config
web.config output
<configuration>
  <system.web>
    <compilation defaultLanguage="c#" debug="true" />
    <customErrors mode="Off" />
  </system.web>
</configuration>
And that's all there is to it. This is extendable further using the powers of NAnt. Using NAnt includes, you can put all of your base or default values in one property file that's referenced in your debugBuild.property or releaseBuild.property, further minimizing code. You can use Scott's pre-build event idea to have each build configuration have its own NAnt command to make mode-specific configuration files.
Feel free to use the above NAnt script however you like; but, as always YMMV. Use it at your own risk.
Enjoy.
CruiseControl.Net 1.3 was released
this morning. To me, most important was the new Build Queue functionality, stopping multiple projects from building at the same time. If ProjectB depends on ProjectA, and they both get code changes committed at the same time, they will fail from contention. Either ProjectA will fail because it can’t delete its old assemblies (because ProjectB has a lock on them) or ProjectB will fail because it can’t find the ProjectA assemblies (because ProjectA deleted them in its rebuild).
No more.
I’m so excited that I am already upgrading our servers!
The day is here: Internet Explorer 7 released this morning, though it is only available to users running Windows XP SP2 or Windows Server 2003. Though it does not yet appear on the list of available updates through Windows Update, you can download it from Microsoft.com. [ News: ZDNet | CNet ] In a CNet review, the reviewing editor notes how the browser is still not compliant with standards set by W3C and recommends switching to Firefox.
“IE 7 was Microsoft’s one chance to leapfrog ahead of the competition, but the company has only barely caught sight of the current front-runners. For more features and greater security, switch to Mozilla Firefox.” ~ CNet [ article ]
There is already a version branded by Yahoo! that includes the Yahoo! toolbar, links to Yahoo’s tools (like Yahoo! Mail), and the default homepage set to Yahoo. Of course, Yahoo! is catching some flak, since it released its “optimized” version prior to Microsoft’s own official release. [ ZDNet ]
Mozilla plans to release Firefox 2.0 in the coming weeks. You can download the current beta, Firefox 2.0 RC3, or the current public release, Firefox 1.5.0.7, from Mozilla.com. [ v2.0 RC3: download | release notes. v1.5: download | release notes ]
Both NAnt and NAntContrib released version 0.85 on Sunday. The changes to NAnt from 0.85 rc4 only include a few bug fixes. NAntContrib has added the ability to specify the encoding on SQL files. All-in-all, not much has changed since 0.85 rc4, but that is a good thing, since it indicates the version is finally ready for release. The first release candidate was made available nearly two years ago.
Despite the minimal changes in the final package, consider upgrading just to get rid of the ‘release candidate’ tag.
NAnt v0.85 [ homepage | download | release notes ]
NAntContrib v0.85 [ homepage | download | release notes ]
For those that missed the announcement last week (like I did), the latest version of CruiseControl.Net has been released.
I plan on checking it out this week, then possibly upgrading our Build environment on Saturday. There are some modifications that I am really excited about:
- Log4Net is used. (Default: Rolling file appender for logging server output.) If the traditional Log4Net configuration block is included in the application configuration file, I will probably change that to the ADONet appender, instead.
- Users can volunteer to fix a broken build. How sweet is that!?!
- <prebuild /> section allows custom tasks to run prior to the build. This one is a big bonus; previously, if something went wrong with the build, often the external log files (NUnit, FXCop) from the previous build would get included in the current build’s report. Now the prebuild can give them the boot.
- Caching is used on WebDashboard. We have some huge log files and some not-so-powerful build servers. Sometimes it takes the machine a while to process the XSL. I am hoping that caching will help with that.
- WebDashboard can stop and start projects. I am very excited about the ability to pause individual projects without having to modify the setup or stop the entire service.
This seems like a nice package (Release Notes). I am eager to pull it down and give it a go.
One gotcha that everyone should be aware of: Old versions of the dashboard and CCTray are incompatible with the new version of the service, so both will need to be replaced. Give your development team a heads-up, so they know to replace their tray installation as soon as the new server version is installed and online.
Microsoft has announced that the upgrade to Internet Explorer 7 will be “high priority” in Windows Update, essentially forcing the upgrade on XP users everywhere (news.com). Microsoft has released a toolkit to disable automatic delivery of the browser upgrade, however this is a pro-active path; if a user does nothing, they are going to get the new version. My poor grandma (Usability: What Would Grandma Do?), who has no idea about any of this, is getting the upgrade. If you have Windows XP, and you have an internet connection, you pretty much are destined for this upgrade.
Now, I don’t think that is entirely a bad thing. Far too many people just blindly use this paperweight we call a computer. They don’t read manuals, they don’t educate themselves on this thing, they just start pressing buttons. When they get a phishing email about “Your bank account has been compromised. Please send me your account number and password so that I can fix it,” they reply with their credentials. “Click here and win an iPod” and they click. “Check out this email attachment of dancing babies” and they get yet another virus. Because of this we have to monkey-proof computers, and add far too many security checks on systems, and overall make developer-life a little more painful. So, I think this is a good thing. Yeah, I drank the Microsoft kool-aid, but I’m all for this automated upgrade to help make up for the swiss cheese that is Internet Explorer 6. I’m going to continue using Firefox as my browser, anyway, but if this makes my OS a little more secure…good!
But what does this mean to us, the development / testing community? Test now. Test often. In a few short months a few million people will unknowingly get IE7, and at that time we will no longer have any excuse about whether or not our systems work. Our stuff needs to work on IE7-Day. So download the beta, and start testing your web apps to make sure everything still works. Microsoft hasn’t been too browser-compliant in the past, and other than competition from Firefox I don’t see a lot of reason that they would start, so there is good reason to suspect things might break. Start testing now, or you will be scrambling in a few months when your help desk lights up like a Christmas tree.
I’m finally catching up on some of the blogs that I haven’t checked out in a while. I came across an intriguing post (on 04 March 2006) by Daniel Grunwald on the #develop teamblog. It seems that he created a tool to analyze Subversion’s ‘Blame’ output to check the ‘Blame’ data from #develop repository and tell what percentage of the code was committed by each contributor. (Incidentally, he has contributed 27% of the application, according to the post’s screenshot.)
My analyzer program gets the person who committed each line of code. Additionally, it searches log messages for the term “patch by” and uses that name instead.
He admits that the tool may need some love, and that some of his parameters are hard-coded, but it may be worth a look. I’m curious to see the contribution stats on our LMS.
Additionally, it is coded in Boo. I’ve been meaning to check out Boo, and getting Daniel’s app working against our configuration might serve as a great introductory Boo task for me.
Most of our Visual Studio solutions contain hundreds of files (classes) organized neatly into dozens of folders (namespaces), but despite all of this organization the vertical content size of the Solution Explorer can get quite large. Finding a particular file when the majority of the tree is expanded is tedious and time-consuming, considering it should be a simple effort of less than five seconds. Fortunately, all of this is solved by the click of a button (assigned to handy macro).
The most useful macro for Visual Studio that I have ever encountered (and in the running for most useful VS tool, period) is the CollapseAll macro authored by one current and one former colleague, Dennis Burton and Mike Shields. In a quick XP effort, Dennis and Mike created a handy macro that recursively collapses the entire Solution Explorer tree down to just the solution and its projects.
With the tree collapsed, it is easy to find that desired file. The macro is functional in all versions of Visual Studio for the Microsoft.Net framework, including Visual Studio 2003, Visual Studio 2005, and Visual Studio 2008.
CollapseAll Macro for Microsoft Visual Studio
Dennis Burton & Mike Shields | Published with Permission
Imports System
Imports EnvDTE
Imports System.Diagnostics

Public Module CollapseAll
    Sub CollapseAll()
        ' Get the the Solution Explorer tree
        Dim UIHSolutionExplorer As UIHierarchy
        UIHSolutionExplorer = DTE.Windows.Item(Constants.vsext_wk_SProjectWindow).Object()
        ' Check if there is any open solution
        If (UIHSolutionExplorer.UIHierarchyItems.Count = 0) Then
            ' MsgBox("Nothing to collapse. You must have an open solution.")
            Return
        End If
        ' Get the top node (the name of the solution)
        Dim UIHSolutionRootNode As UIHierarchyItem
        UIHSolutionRootNode = UIHSolutionExplorer.UIHierarchyItems.Item(1)
        UIHSolutionExplorer = Nothing
        UIHSolutionRootNode.DTE.SuppressUI = True
        ' Collapse each project node
        Dim UIHItem As UIHierarchyItem
        For Each UIHItem In UIHSolutionRootNode.UIHierarchyItems
            'UIHItem.UIHierarchyItems.Expanded = False
            If UIHItem.UIHierarchyItems.Expanded Then
                Collapse(UIHItem)
            End If
        Next
        ' Select the solution node, or else when you click
        ' on the solution window
        ' scrollbar, it will synchronize the open document
        ' with the tree and pop
        ' out the corresponding node which is probably not what you want.
        UIHSolutionRootNode.Select(vsUISelectionType.vsUISelectionTypeSelect)
        UIHSolutionRootNode.DTE.SuppressUI = False
        UIHSolutionRootNode = Nothing
    End Sub

    Private Sub Collapse(ByVal item As UIHierarchyItem)
        For Each eitem As UIHierarchyItem In item.UIHierarchyItems
            If eitem.UIHierarchyItems.Expanded AndAlso eitem.UIHierarchyItems.Count > 0 Then
                Collapse(eitem)
            End If
        Next
        item.UIHierarchyItems.Expanded = False
    End Sub
End Module
Based on code from Edwin Evans
Here, the macro is so popular that it is a part of our default developer’s build for every new machine, and is conveniently assigned to a toolbar button. The default button icon list contains an Up Arrow (in the Change Button Image menu when customizing the toolbar) that seems quite appropriate. That little button has saved us all from a lot of pain, five seconds at a time.
CruiseControl .Net 1.0 has been released. download | release notes
This is a must upgrade for anyone running v0.9 or earlier. There are many updates that I am excited about, most notably the overhaul to CCTray (the client-side build monitoring tool that sits in your system tray). Our developers have had to use Firefox’s CC.Net monitor extension to monitor multiple builds, simultaneously. No more.
We will be upgrading within the next week.
MSIExec error code 1605 has been a thorn in my side for quite a while. When an MSI was command-line deployed by one user (manually deployed by me in the middle of the day), it couldn’t be uninstalled by another (automation during the nightly) due to the “Just Me” default. If I installed it through using the UI, and installed it for use by “Everyone”, then the nightly would build just fine. I needed a way to run an “Everyone” install from the command line, but Google wasn’t helping me out. Unfortunately, Microsoft does not seem to have a lot of documentation on this functionality, either.
It further frustrated me this morning when my nightlies were failing again, but only on one server. Of course, I manually deployed the package to this same server to a few days ago. I tried Google again, and this time hit pay dirt. Executing it with ALLUSERS=2 in the command line makes it available for everyone. Apparently, it forces an “Everyone” install for the UI, too.
Finally I can pull the thorn out.
MSIExec /i mypackage .msi … ALLUSERS=2
“It compiles! Ship it!”
Microsoft has sent Visual Studio 2005 to the printers. That brings .Net 2.0 to the table in all of its glory. The official release date is still November 7, and though it is available now to all of us MSDN subscribers (though the site is too flooded to ping, let alone download), there is still some question on if the media will be ready in time to go in all of the pretty little VS05 boxes at your local Microsoft store.
Hopefully this will save a few of you some time: I have created a registry entry that will create file associations and commands for your NAnt .build files. It will associate .build files as “NAnt Build Files” and create two commands for right-clicking a .build file in Explorer: “Edit” will open the file in Notepad; “Run” will execute the file in NAnt using a persistent command window (the window won’t disappear when the script is finished).
NAnt Build File Associations
Windows Registry Editor Version 5.00
[HKEY_CLASSES_ROOT\.build]
@=”build_auto_file”
[HKEY_CLASSES_ROOT\build_auto_file]
@=”NAnt Build File”
“EditFlags”=dword:00000000
“BrowserFlags”=dword:00000008
[HKEY_CLASSES_ROOT\build_auto_file\shell]
@=”Edit”
[HKEY_CLASSES_ROOT\build_auto_file\shell\&Run]
@=”Run”
[HKEY_CLASSES_ROOT\build_auto_file\shell\&Run\command]
@=”C:\WINDOWS\system32\CMD.EXE /k “C:\Program Files\NAnt\bin\NAnt.exe” -buildfile:%1″
[HKEY_CLASSES_ROOT\build_auto_file\shell\&Run\ddeexec]
[HKEY_CLASSES_ROOT\build_auto_file\shell\&Run\ddeexec\Application]
@=”NAnt”
[HKEY_CLASSES_ROOT\build_auto_file\shell\&Run\ddeexec\Topic]
@=”System”
[HKEY_CLASSES_ROOT\build_auto_file\shell\edit]
@=”&Edit”
[HKEY_CLASSES_ROOT\build_auto_file\shell\edit\command]
@=”C:\WINDOWS\system32\NOTEPAD.EXE %1″
[HKEY_CLASSES_ROOT\build_auto_file\shell\edit\ddeexec]
[HKEY_CLASSES_ROOT\build_auto_file\shell\edit\ddeexec\Application]
@=”NOTEPAD”
[HKEY_CLASSES_ROOT\build_auto_file\shell\edit\ddeexec\Topic]
@=”System”
Use this code/file at your own risk. I offer it as is, without any support. By downloading this file or using this code you take full responsibility for any repercussions that it may have on your computer.
Must Have Tools
- Notepad2: A vital, essential, notepad replacement. Color-codes your text using syntax schemes identified by the file’s extention. I followed Scott Hanselman and “renamed ‘Notepad2.exe’ to ‘n.exe’ which saves me a few dozen ‘otepad’s a day.”
- PsExec: [blog entry] Execute remote applications, remotely. Great for installing an MSI on a remote box without resorting to Remote Desktop. Also great for launching solitaire on your buddy’s machine and harrassing him for slacking at work.
Testing Tools
- Screen Hunter 4.0 Free: [blog entry] Free screen capture tool that is a requirement in any tester’s toolbelt.
- Watir: [blog entry] Web Application Testing In Ruby. An automated functional testing tool for automated browser tests in IE. Scripts are written in Ruby.
Continuous Integration Tools
- CruiseControl.Net: Monitor your source. Can be used to manage automated builds, build status, and reports from NUnit, FXCop, etc.
- NAnt: Free build tool for .Net. Use with CruiseControl.net to automatically build nightlies or whenever a code change occurs.
- NantContrib: An extention for NAnt. Adds some useful tasks that NAnt does not include, such as integration with VSS.
Scott Hanselman is my new hero. He is filling the hole—the one thing preventing Watir from becoming real competitor in the automated functional test market: script recording. Watch out Mercury; by creating WatirMaker, Scott is opening the flood gates, and Watir is going to come pouring through.
This changes everything.
I started out my career as a developer, but as I noted in an earlier blog, I get much more enjoyment from breaking things than I do building things, so I jumped ship. With my development experience I can delve in to making some rather wicked scripts for QTP, LoadRunner, and lately, Watir. However, my testers don’t share my skill set. My biggest hurdle in ousting QTP and making Watir our standard is the lack of recording; I can not expect every tester to start coding away in Ruby. It should come as no surprise that when I opened Scott’s blog this morning, I was so excited that I nearly wet myself.
It is a work in progress, but soon Scott hopes to have a fully functional recording tool for Watir. With WatirMaker, my testers can hit a button and start clicking away in IE; the tool will happily watch like a little kid on the sidelines, learning every move. My testers can all adopt Watir with open arms, and we can wave goodbye to that Mercury maintenance contract.
The only thing left to say is: “Scott…thanks!”
In code deployment, it is often necessary to perform tasks that must be executed locally on the destination box, such as installing through an MSI or installing assemblies to the GAC through GACUtils. Thankfully, there is a way that this can all be done remotely, with any process, as long as it can be accessed through a command prompt. The destination computer will think that you are working on it directly, though it may just be your NAnt script doing the work for you.
SysInternals publishes a tool called PsExec. It allows you to execute a program remotely on a remote machine. To the remote machine the process is running locally. Because of this, you can use traditional command line tools to run programs and utilities, such as GACUtil to install a new assembly to the GAC on a remote box–a feature that most other options don’t support.
PSExec \MyServer "C:\WINDOWS\Microsoft.NET\Framework\v1.1.4322\GACUtil.exe" "C:\bin\MyAssembly.dll"
Note: the paths are all ‘local’ paths on \\MyServer, just as you would enter from a command prompt in an RDP session to MyServer. You will also need to customize the paths to include whatever location and framework version your remote machine uses.
As for me, because our web applications make thorough use of the GAC, our only deployment method is a VS.Net Deployment project to create a MSI. We have NAnt scripts that upload the MSI to remote machines then execute PsExec run the installation (MSIExec) in unattended mode. It has brought our deployment time down from a manual 30-45 minutes to an automated 15 minutes, and allows code managers to spend those 30-45 minutes doing something else. We save even more time when we deploy to production, which contains an 8-server web farm.
If you are anything like me, you probably have the latest version of Internet Explorer and/or Firefox on your machine.
If you are anything like me, you have clients that don’t. They are often still supporting Internet Explorer 5, or some archaic version of Netscape.
Though it is a little dated, I found a rather helpful post on semicolon, today. The post on multiple Internet Explorer versions in Windows discusses stand-alone versions of Internet Explorer available through an Internet Explorer browser archive from evolt.com. The post goes one step further, identifying a defect in IE where every version uses common registry settings causing it to always identify itself as v6, even if you are using a different version. The post contains a workaround; drag this Version bookmarklet to your links toolbar, and when you click it, it will show your actual version.
I would also like to take his post one step further. The full browser archive, which semicolon does not mention. Not only does evolt include Internet Explorer, but seemingly every browser ever available, such as Netscape Navigator, Opera, and Lynx.
In case you haven’t heard of it yet, Watir is the greatest thing to hit automated functional testing since…well…ever. Watir (pronounced “water”), or Web Application Testing In Ruby, is an open source automated functional testing tool powered by Ruby. My company has been living off QuickTest Pro, and it is not much of a leap to Watir. Much like QTP, it automates an instance of Internet Explorer and navigates its way around your web site, however unlike QTP, it doesn’t hijack your computer when you do it; with Watir, the IE window doesn’t have to be the foreground window, so you can get something else done while your test is executing. Watir also allows various checks much like QTP, but though programming includes the capability of checking much more, such as object hierarchy or object style. (Yes, Watir can make sure that your validation messages are red!)
Your money manager will love Watir, too. Our switch from QTP will save us thousands of dollars per year from Mercury’s annual support costs. For a moment, I think our company president’s pupils turned to dollar signs like a cartoon. If you are like me, and spend your QTP days in ‘Expert’ view (Source code), you will pick Watir up quickly. I even find it better than QTP. Additionally, since it is just a source code file, edited in Notepad if you like, it can be stored in your favorite source control application AND (this is a big ‘and’) your developers can execute the automated tests themselves without proprietary software like QTP. Its easy integration with NUnit will also tie your automated functional tests in with applications like Nant and CruiseControl.
More Information
Read all about Watir.
Read Bret Pettichord’s (a Watir creator) blog entry about Watir.
Screen Hunter 4.0 Free - www.wisdom-soft.com
Screen Capture Tool
Cost: Free
Quite possible the most essential task for any tester is taking a snapshot of the current screen to give their developer a visual representation of the logged error. The classic Windows hotkey, [Alt] + [PrtScn], will take a screen capture of the entire active window. However, sometimes the text on a link is spelled wrong, a button uses the wrong icon, or an error message displays in the wrong style; in these scenarios an entire screen grab is overkill and often confusing. Yet there are few things that a tester can do about that short of opening up MS Paint or Macromedia Fireworks and cropping the image, completely wasting valuable time and causing pointed comments from the Project Manager about diddling in Photoshop.
Screen Hunter 4.0 Free allows you to capture the important pixels quickly and effortlessly. Tap F6 (The default hotkey, but it can be modified), and your cursor changes to a cross-hair. Click-drag a box around whatever you want to capture, and it’s done. Instantly cropped screen capture for your bug-tracking pleasure.
The developers will be happier, too.
|